About the Customer Portal
The Customer Portal is a secure and easy-to-use platform designed to put you in control of your account. Here's what you can do:
- Manage everything in one place: view and update information about your portal users, centres, wearers, orders, and issued monitors.
- Track your orders: see the delivery status of your orders.
- Access dose reports: download dose reports in multiple formats.
- Export your data: use filters to tailor data exports to your specific needs.
Should you have any questions or feedback, please email prms@arpansa.gov.au or call 1800 678 112.
Responsible Use Agreement for the PRMS Customer Portal
All authorised users (Customers) are expected to:
- Use the Customer Portal as intended.
- Respect the privacy of data in the Customer Portal.
- Not damage or compromise the Customer Portal.
- Exercise due care, skill and judgement when submitting and interpreting data and using the Customer Portal.
- Acknowledge that the Customer is responsible for its online accounts and for the activities of anyone who uses such accounts.
- Maintain the confidentiality and security of its Customer Portal login credentials and to promptly notify PRMS of any known or reasonably suspected unauthorised access to its account, login credentials, or any other actual or potential breach of security of which it has knowledge of involving the Customer Portal.
- Acknowledge that ARPANSA reserves the right to refuse access at any time.
Quick start user videos
PRMS Portal
Adding a new user:
Adding wearers and spare monitors:
Dose histories:
Update wearer persona details:
Update monitor usage:
Getting started
Registering a new centre
The customer portal is available to all ARPANSA customers. To sign-up a new centre:
- Visit the Order monitors and update details page.
- Complete and submit the ‘New Centre Online Registration Form’.
- Your form will be processed, and your account set up within 1-2 business days. You will receive an email with the information you need to access the portal.
Access levels
The portal has two types of users:
1. Administrator
An administrator:
- is a gatekeeper who approves new user registrations and sets their access levels.
- can add or remove wearer groups to or from a centre.
- can download audit logs for tracking activity.
Each centre should have at least two administrators to avoid access issues for new users if one is unavailable.
2. User
A user has the same rights as an administrator to view and modify all information in the portal except the three administrator-specific actions highlighted above. A user can manage everything else related to their account.
Registering to use the Customer Portal
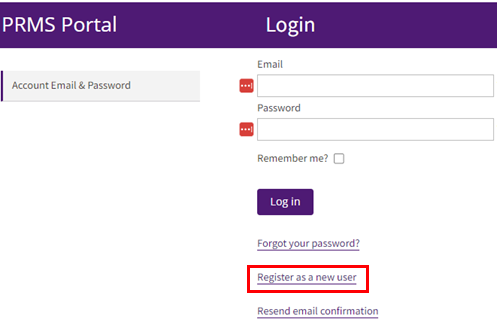
- Go to the login page and click ‘Register as a new user’.
- Fill out the registration form with your details.
- Click ‘Register’.
- Check your email for a verification message and click the link to confirm your email address. If the email does not arrive within a few minutes, check your spam/junk folder.
- Wait for your local portal administrator to review and approve your request.
- You will receive a final email confirmation once you are granted access.
Reviewing new user registrations
As a centre administrator, you will be notified when someone requests access to the PRMS portal. Here is how to approve or deny the request:
Find the request
- Go to ‘Home’ and check the ‘Access Requests’ column for your centre.
- Click on ‘View’ (far-left column) for the centre with a new request.
- Select ‘Portal Users’ (left menu).

Review user details
- Look for users with ‘New User’ status under the ‘User Account Status’ column.
- Click ‘View’ on the specific request (far-left column) to see their information.

Make a decision
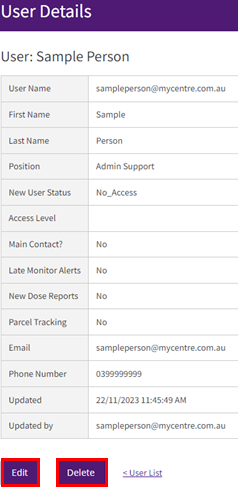
- Delete: if the request is suspicious or unnecessary, click ‘Delete’.
- Approve: if the request is legitimate, click ‘Edit’.
Approve and set access
- Review and edit details if needed.
- Choose ‘User’ or ‘Administrator’ access level.
- Decide if this user is the main contact for your centre and set their notifications.
- Click ‘Save’ to approve and grant access.
Things to remember
- You can change user information (including the access level), or delete the user, anytime.
- The administrator’s approval is crucial for security and privacy reasons. Only staff with a genuine need to access the portal should be granted access.
- The portal is not intended for all staff to be given logins to view their doses.
Logging into the portal with multifactor authentication
- Enter your username and password on the login page.
- Check your email for a 6-digit access code (wait a few minutes if needed). If the code does not arrive within a few minutes, check your spam/junk folder. Keep in mind that the code expires after 6 minutes.
- Enter the code on the login page and click ‘Log in’.
Your centres
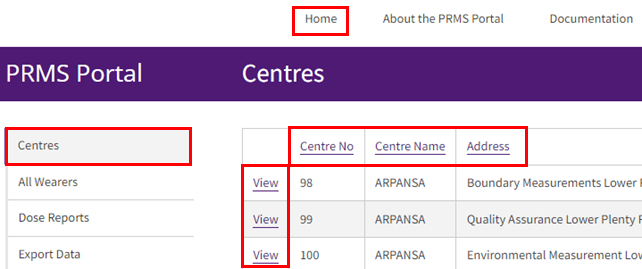
- Once you are logged in, you will see a summary of your associated centre(s).
- Click ‘View’ next to a centre to access its details.
- Click ‘Home’ at the top or ‘Centres’ in the left-side menu to return to the main screen from anywhere in the portal.
- You can sort information in any table by clicking the relevant column header.
Centre details
Accessing your centre’s details and options
- Click ‘View’ next to your centre on the home screen.
- A submenu appears (left menu) with options such as ‘Centre Wearers’ and ‘Issued Monitors’. Explore these options to manage various aspects of your centre.
Making changes
- For ‘Notes’ or ‘Late Monitor Warning’ options, click ‘Edit’ at the bottom of the Centre Details screen. Make your changes and click ‘Save’.
- For changes to other information on the Centre Details screen, click ‘Centre Changes’ and fill out the web form.
Finding the user list
- Go to the ‘Home’ screen and click ‘View’ on your desired centre. Select ‘Portal Users’ from the left- menu.
Viewing and editing user details
- Click ‘View’ next to a user to see their details.
- Click ‘Edit’ to change personal information, active/inactive status, access level, or types of notifications they receive.
- Click ‘Delete’ to permanently remove a user.
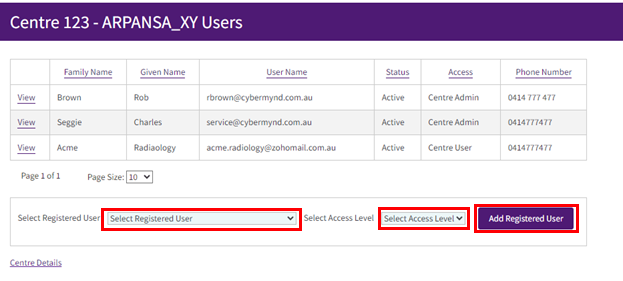
Adding existing users
To add a user already registered with another of your centres:
- Use the ‘Select Registered User’ function at the bottom of the Portal Users screen.
- Find the user via the ‘Select Registered User’ drop-down menu.
- Choose their access level and click ‘Add Registered User’.
Managing Wearer Group(s) and Wearers at your centre
Managing Wearers
Accessing and editing wearer information
- Go to the ‘Home’ screen and click ‘View’ next to the desired centre. Select ‘Centre Wearers’ from the left menu.
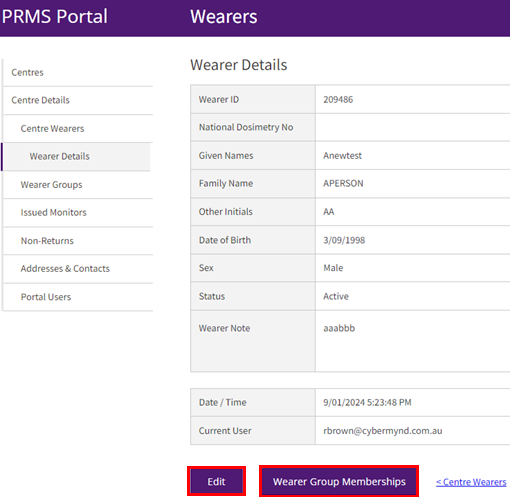
Editing individual wearer details
- Find the wearer you want to edit in the table.
- Click ‘View’ next to the wearer name.
- Use the ‘Edit’ button to modify:
- personal information
- notes about the wearer
Checking wearer group memberships
- Click ‘Wearer Group Memberships’ at the bottom of the Wearer Details screen. This shows all wearer groups they belong to across your accessible centres.
Wearer group configurations
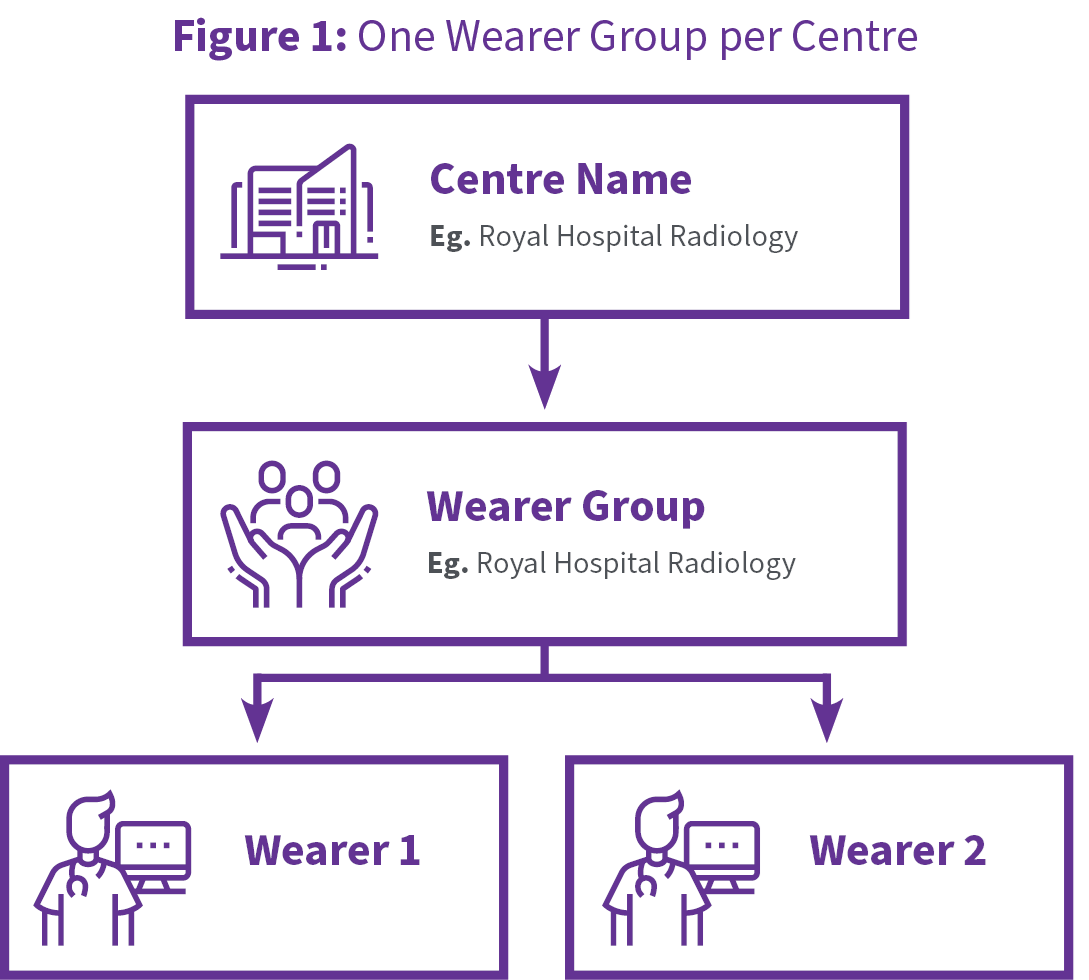
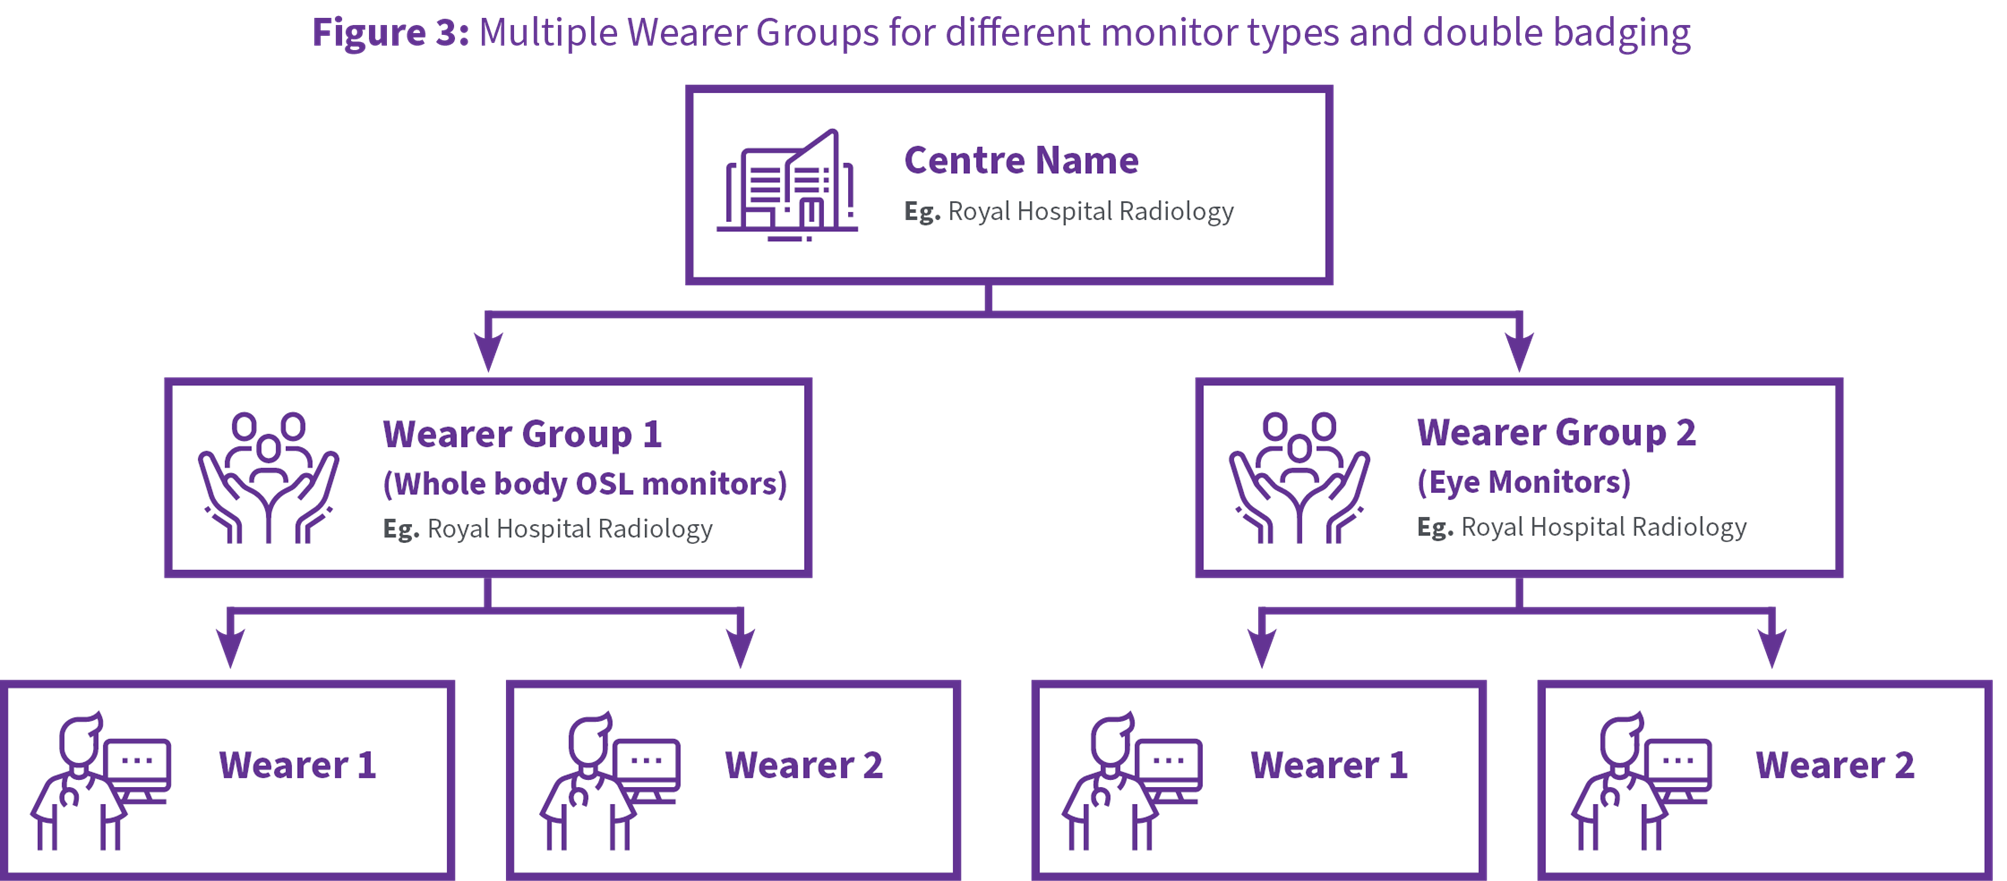
The portal offers a flexible way to manage different radiation monitoring needs through a three-tier system:
- Centre: this is the top level, named after your organisation or department (e.g. ABC Dental, Royal Hospital Radiology).
- Wearer Group: this level allows you to have different monitor types or multiple control monitors for different areas (e.g. whole body and eye monitors, or separate controls for different floors).
- Wearer: this is the individual person wearing the monitor.
Here are some common scenarios:
One wearer group per centre
Most centres with one control monitor for background radiation and standard whole body OSL monitors only need one wearer group named the same as the centre (Figure 1).
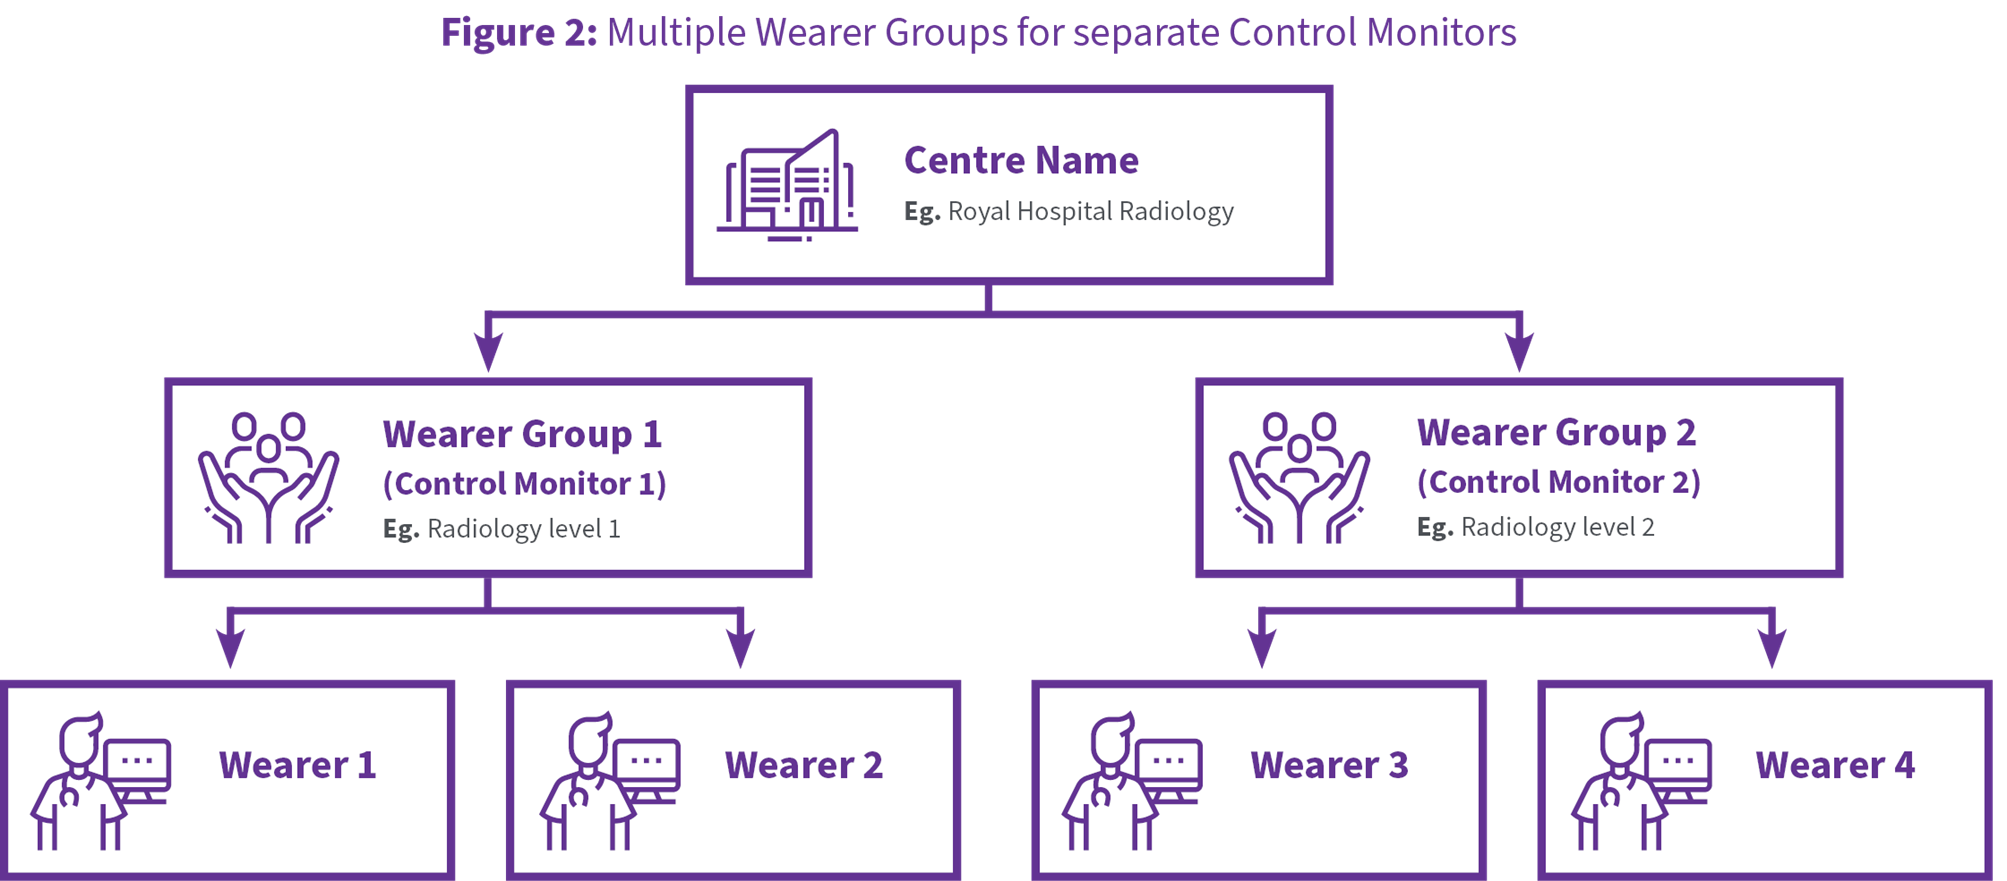
Multiple wearer groups with separate control monitors
Larger centres or those spread across different areas of a facility might benefit from having separate wearer groups with their own control monitors (Figure 2). This ensures accurate background radiation readings and synchronised monitoring periods.
If your work groups are at different locations or need separate monitor deliveries, set them up as separate centres. Contact PRMS for help if unsure.
Multiple wearer groups for different personal monitor types and double badging
Some centres might need different monitor types such as eye or extremity monitors besides whole-body OSLs, or double badging for use with lead aprons. In these cases, you can also use separate wearer groups (Figure 3).
Viewing and adding wearer group(s)
Think of a wearer group as a team of people using the same type of radiation monitor under one control monitor. Most centres only need one group, but others might need more for:
Different monitor types: whole-body monitors plus eye monitors or extremity monitors.
Separate locations: different floors or buildings within the same facility.
For more information on the purpose of control monitors and how to store them correctly, please refer to our Control Monitor factsheet.
Viewing wearer groups
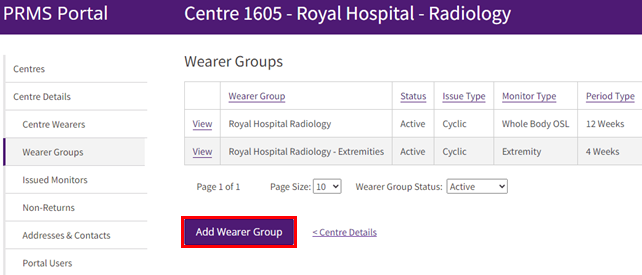
- Go to ‘Home’ > ‘View’ Centre Details > ‘Wearer Groups’ (left menu).
Adding a new wearer group (administrators only)
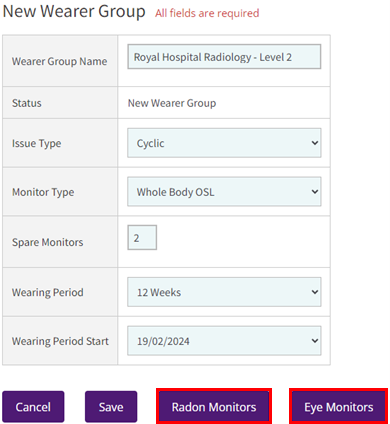
- Click ‘Add Wearer Group’.
- Name the group clearly (e.g. ABC Radiology - Extremities).
- Choose ‘Cyclic’ for ongoing issues or ‘Single’ for a once-off issue.
- Select monitor type (whole-body, neutron, extremity) from the dropdown list.
- Order spare monitors if needed (can be reassigned later as area monitors or for unregistered wearers).
- Choose wearing period (default is 12 weeks, except for pregnancy and extremities which is 4 weeks).
- Select a wearing period start date from the dropdown list.
- Click ‘Save’.
Adding wearers to a group
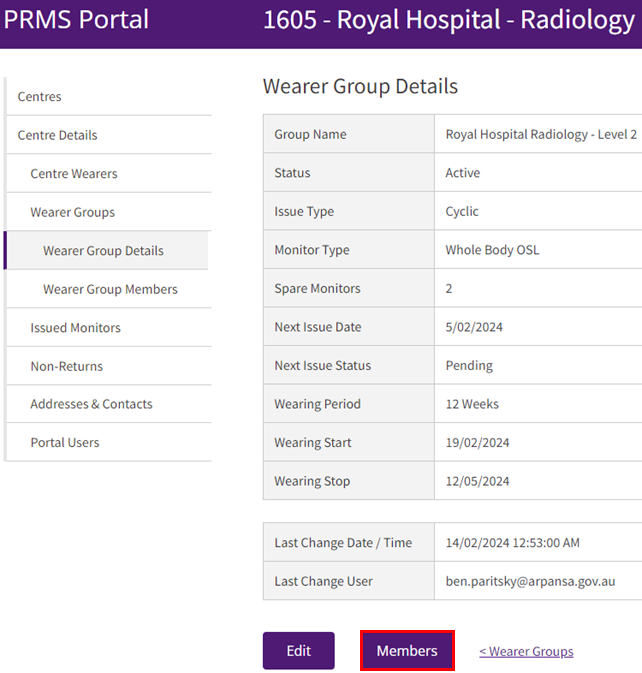
- Click ‘Members’ in the new wearer group summary screen.
- Follow the steps in Managing wearers to add existing wearers or to register new ones.
Things to remember
- A wearer group becomes active if spare monitors have been ordered or when wearers are added.
- A wearer group becomes inactive if no spare monitors have been ordered and all wearers are removed.
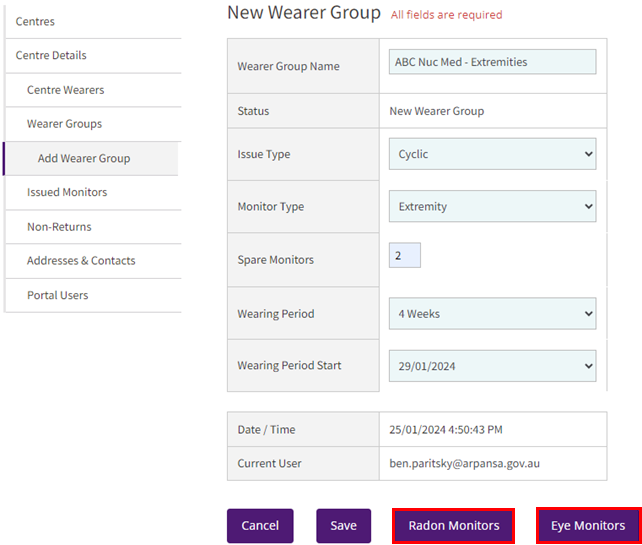
- To order eye or radon monitors, use the buttons at the bottom of the screen for a separate webform.
- Only centre administrators have permission to create and delete wearer groups.
Managing wearers
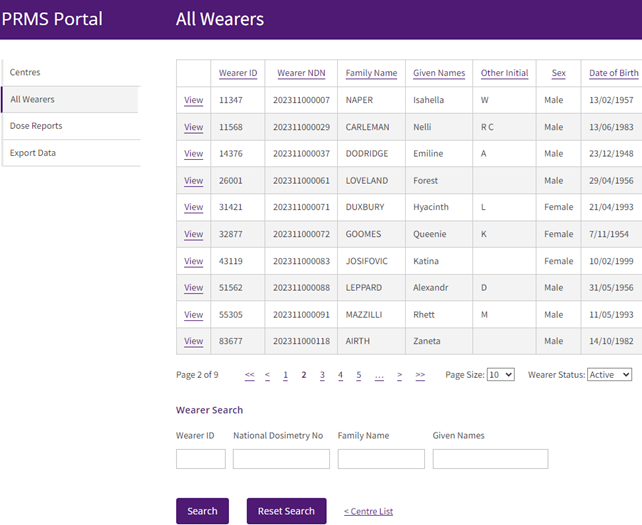
To view and manage all your wearers
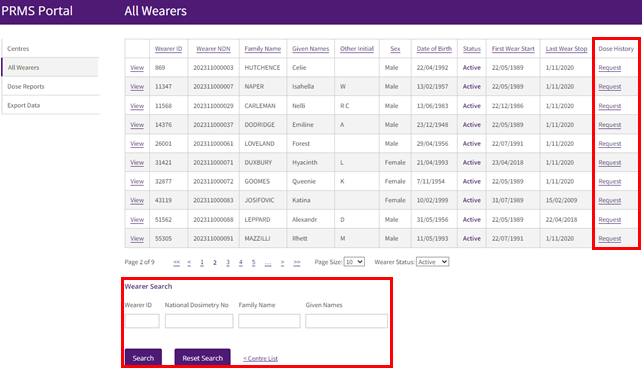
- Go to ‘Home’ > ‘All Wearers’ (left menu).
You can search for wearers using the fields at the bottom of the page, filter by status, and request dose reports.
- Click ‘View’ next to a name for details and notes.
- Click ‘Edit’ to update a wearer’s info or click ‘Wearer Group Memberships’ to see which wearer group(s) they belong to.
View wearers specific to a centre
- Go to ‘Home’ > ‘View’ a centre.
- Select ‘Centre Wearers’ (left menu).
Adding a wearer
- Choose the ‘Centre’ and ‘Wearer Group’.
- Click ‘Wearer Group Members’ in the Wearer Groups details screen.
- Click ‘Add Wearer’.
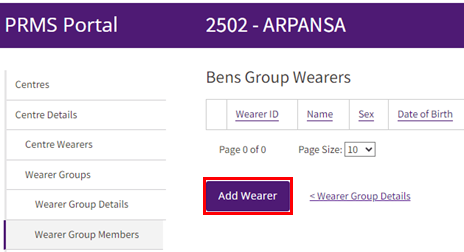
Adding an existing wearer (from one of your other wearer groups or centres)
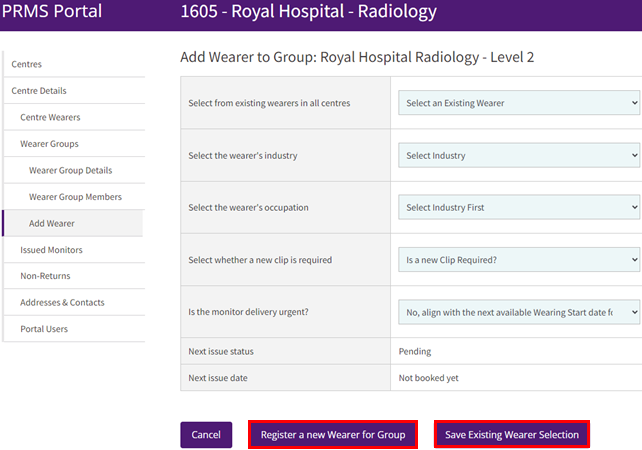
- Select an existing wearer from the dropdown list.
- Select the industry and occupation.
- Choose clip option and monitor issue timing.
- Click ‘Save Existing Wearer Selection’.
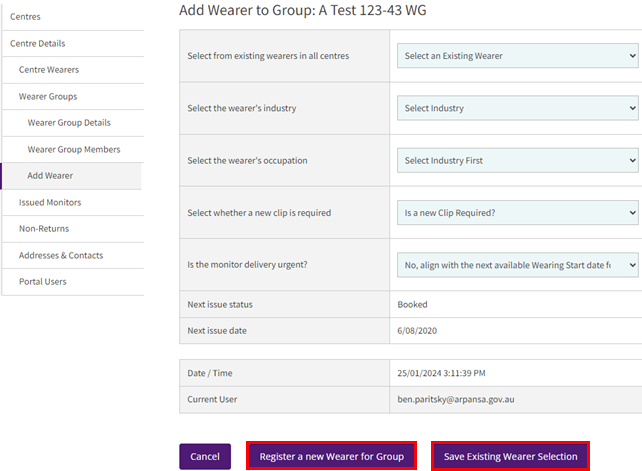
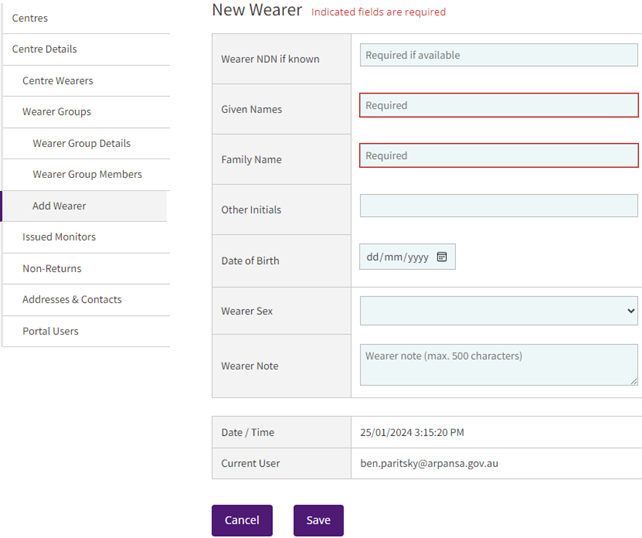
Adding a completely new wearer
- Follow steps 2 to 3 for Adding an existing wearer.
- Click ‘Register a new Wearer for Group’.
- Enter full name, date of birth, sex, and (optional) NDN.
- Click ‘Save’.
A National Dosimetry Number (NDN) is the unique identification number given to individuals who have their dose records stored in the Australian National Radiation Dose Register (ANRDR).
Removing and deactivating wearers
Removing a wearer from a group:
- Go to ‘Home’ > ‘View Centres’ > ‘Centre Details’ (left menu).
- Select ‘Wearer Groups’.
- Choose the group and click ‘Members’.
- Click ‘View’ next to the wearer you want to remove.
- Click ‘Remove From Group’.
- Confirm deactivation if it is their last group.
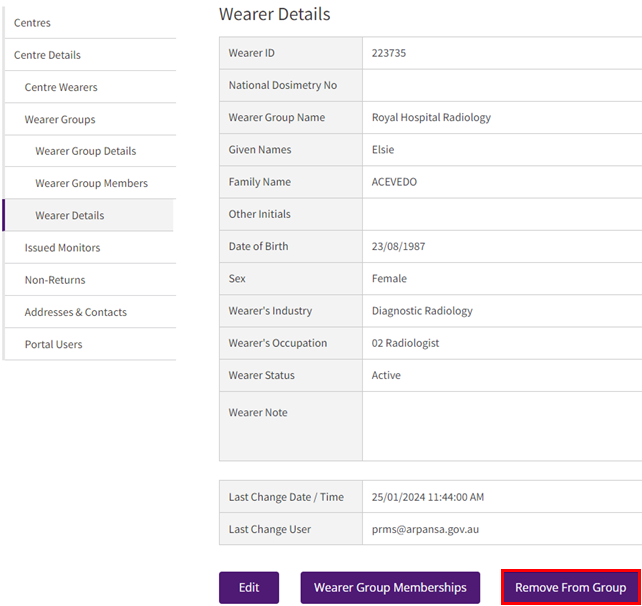
Reactivating a wearer
See instructions on Adding an existing wearer.
Things to remember
- Use full legal names to avoid duplicates.
- An ‘Active’ wearer belongs to at least one wearer group. Removing a wearer from their last wearer group will deactivate them. Adding a wearer to a group will reactivate them.
Requesting a dose history report
A dose history report shows a worker's radiation exposure during their career across different jobs and locations. It requires approval before release.
How to request it
- Go to ‘Home’ > ‘All Wearers’ (left menu).
- Search for the worker or find them on the list.
- Click ‘Request’ in the ‘Dose History’ column.
Things to remember
- Dose history reports may include doses from other jobs.
- They are sent to the worker unless we receive written permission to share it with their employer.
- The worker can share it with their employer themselves if they choose.
Alternative option:
See Section 9 for using the ‘Export Data’ function.
Managing monitors
Viewing issued monitors
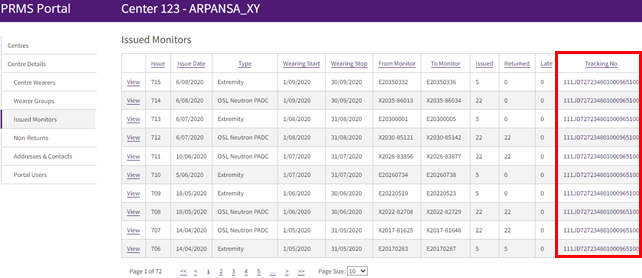
Go to ‘Home’ > ‘View’ Centre > ‘Issued Monitors’ (left menu).
Tracking deliveries
In ‘Issued Monitors’, click the tracking number for details.
Late monitors (60+ days past the end wear date)
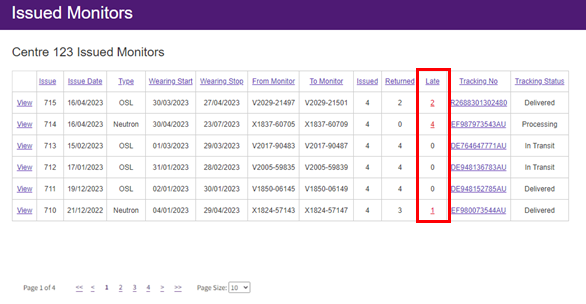
- Late monitors are identified in red on the ‘Issued Monitors’ screen.
- Click the number highlighted red in the ‘Late’ column for a list of late monitors.
- Return monitors including the control within 60 days of the end wear date to avoid late fees.
- See types of monitors we provide for fee details.
Non-Returned monitors (within 60-day return window)
Monitors not received at our lab within 30 days of the end wear period will appear in this screen.
- View them under ‘Home’ > ‘View’ Centre > ‘Non-Returns’ (left menu).
Updating monitor usage
To change how a monitor was used, who wore it, or the wear/use dates you need to view individual monitors:
- Go to ‘Issued Monitors’ (see Viewing issued monitors for instructions).
- Click ‘View’ next to the relevant batch.
- Click ‘View’ on the monitor you want to update (spares appear at the end of the list).
Monitor usage options
- Spare: for unregistered wearers, short-term use, or area monitoring (see Section 5.6.2 for ordering spares).
- Control: measures background radiation, don't change its status! For proper use and storage, see our Control Monitor factsheet.
- Registered Wearer: existing wearer with a unique PRMS wearer ID.
- Unregistered Wearer: one-time use (e.g. short-term workers or visitors).
- Area: measures ambient radiation above background.
- Environmental: measures all ambient radiation including background.
- Not Used: apply to monitors not used for any purpose.
Updating the actual usage
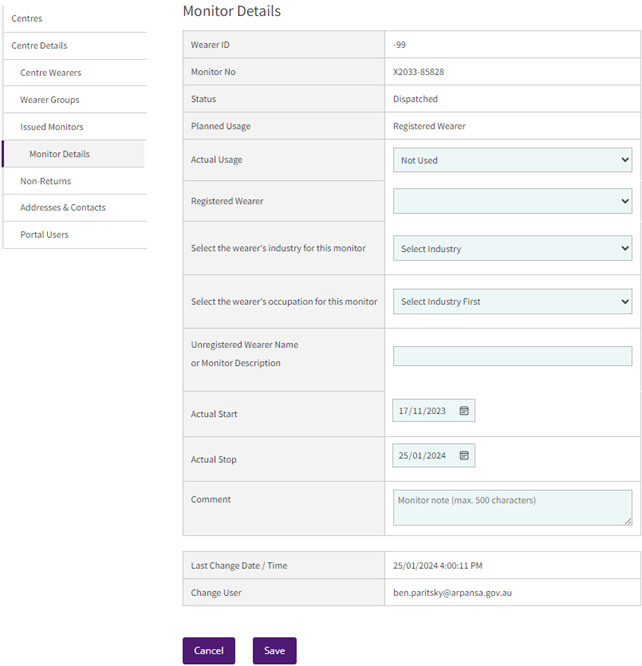
- Click ‘Edit’ in the ‘Issued Monitor Details’ screen.
- Select ‘Actual Usage’ from the dropdown menu.
- For ‘Registered Wearer’, choose from existing wearers.
- For ‘Unregistered Wearer’ (one-time use only) or any other usage type (e.g. area monitor), enter their name or monitor description in the ‘Unregistered Wearer Name or Monitor Description’ field.
- Edit wear/use dates, add (optional) comments.
- Click ‘Save’ to confirm changes.
Remember:
- Accurate monitor and control usage is crucial for dose calculations and regulatory compliance.
- Do not change the control monitor's status or use it on people.
- Register new employees before assigning monitors.
Ordering additional monitors
Additional monitors can be ordered by adding them to a Wearer Group. Described below are several ways this can be achieved.
For registered wearers/new employees
- Go to ‘Home’ > ‘View’ Centre > ‘Wearer Groups’ (left menu).
- Choose the group and click ‘Members’.
- Click ‘Add Wearer’.
- Select an ‘Existing Wearer’ from the drop-down menu or click ‘Register a new Wearer’.
- Choose industry, occupation, etc.
- Click ‘Save Existing Wearer Selection’ (if using the existing wearer option) or ‘Register a new Wearer for Group’ (if registering a new employee).
For unregistered wearers, area, or environmental monitors
- Go to ‘Home’ > ‘View’ Centre > ‘Wearer Groups’.
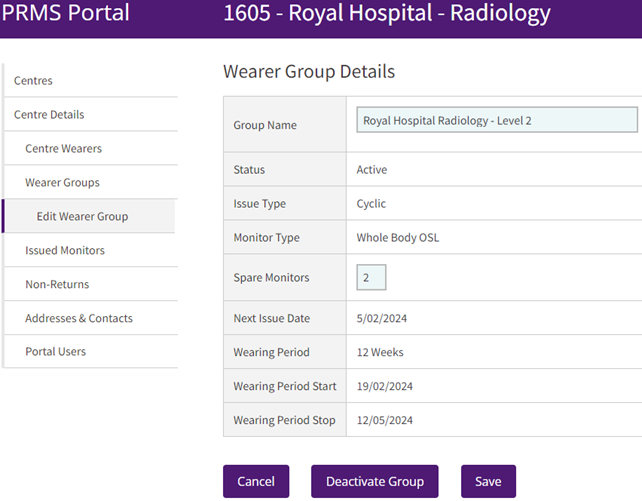
- Click ‘Edit’ for the desired group.
- Enter the number of spare monitors needed.
- Click ‘Save’.
Things to remember
- When your ‘spare’ monitors arrive, update their usage to ‘unregistered wearer’, ‘area’, or ‘environmental’ monitors. See Updating monitor usage.
- A control monitor comes free with each batch, no need to order separately.
- On the Wearer Groups screen, the ‘Spares’ column indicates how many spare monitors have been requested on a recurring cycle. The default is set at zero.
- For a single order of spares, change the number of spares back to zero after your order is dispatched.
- Extremity and neutron monitors need separate wearer groups.
Ordering extremity and neutron monitors
If you need to order extremity or neutron monitors, you need separate wearer groups for each monitor type.
Creating a wearer group (administrators only)
- Go to ‘Home’ > ‘View’ Centre > ‘Wearer Groups’.
- Click ‘Add Wearer Group’.
- Name the group clearly (e.g. ABC Radiology - Extremities).
- Choose ‘Cyclic’ or ‘Single’ issue type.
- Select ‘Extremity’ or ‘Neutron’ as the monitor type.
- Choose the number of spare monitors (optional).
- Set the wearing period (4 weeks for extremity and pregnancy, 12 weeks for others).
- Pick a start date (the next issue cycle automatically aligns with other groups in your centre).
- Click ‘Save’.
Adding Wearers
- Click ‘Members’ in the new Wearer Group Details summary screen.
- Follow steps in Managing wearers.
Things to remember
- Our neutron monitors also measure photons. No need to order additional whole body OSLs for neutron monitor wearers.
- Contact PRMS for double badging orders (for use with lead aprons).
- Use separate web forms for eye and radon monitors from the ’Add Wearer Group’ screen.
- Only centre administrators have permission to create wearer groups.
Dose reports
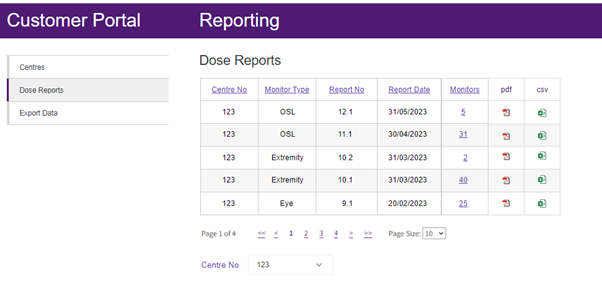
- Go to ‘Home’ > ‘Dose Report’ (left menu)
- Click the PDF icon for a user-friendly report.
- Click the CSV icon for a version which can be imported into radiation safety software.
Late monitor warnings
Late fees apply if monitors are not back in our lab within 60 days of the wearing stop date.
The default reminder is set at both 30 and 45 days after the wearing stop date. Reminders are sent only if the monitors have not been received at our lab by that date.
Change your reminders
- Go to ‘Home’ > ‘View’ Centre > ‘Edit’ your Centre.
- Choose your preferred option from the ‘Late Monitor Warning’ drop-down:
- Both 30 & 45 days (recommended)
- 30 days only
- 45 days only
- No warnings
- Click ‘Save’.
Centre contact and address details
Viewing and updating information:
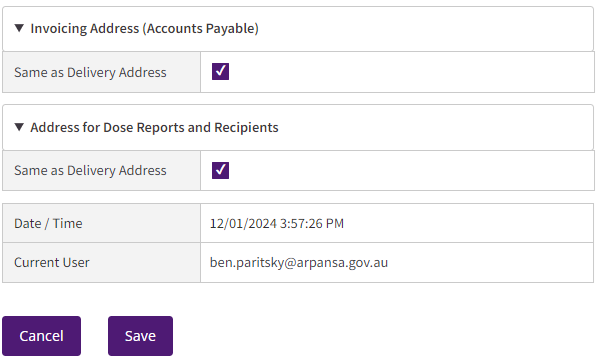
- Go to ‘Home’ > ‘View’ Centre > ‘Addresses & Contacts’ (left menu).
- See your delivery address, optional invoicing address, and optional additional dose report contacts.
- Click ‘Edit’ to change any details.
- Tick ‘Same as Delivery Address’ for invoicing and dose reports if they are the same.
Adding a new address
- Click ‘Edit’ at the bottom of the ‘Addresses & Contacts’ screen.
- Fill in the address details and contact information then click ‘Save’.
Things to remember
- You can have up to 3 addresses associated with your centre.
- Multiple email addresses separated by semicolons can be included in the same field for convenience.
Exporting data
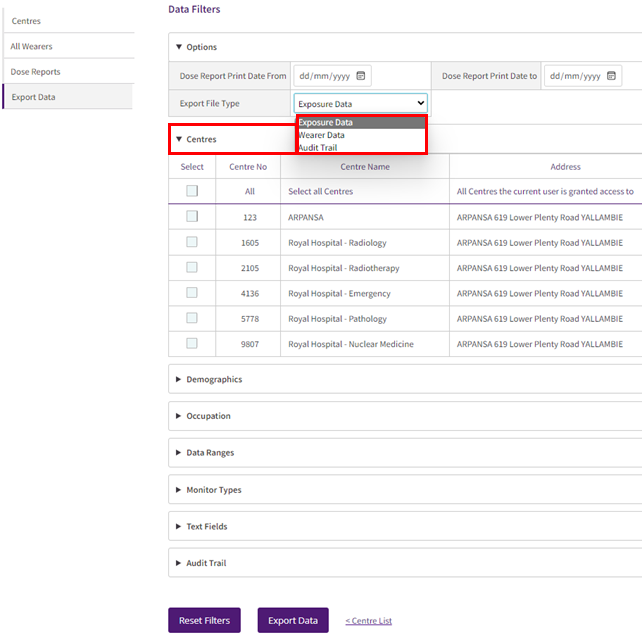
The PRMS portal's data export tool lets you export specific data for analysis or research. You can filter by:
- Centres: select one or all centres you have access to.
- Demographics: filter by wearer ID, age range, date of birth, sex, and other parameters.
- Occupation: filter by industry and occupation.
- Data ranges: choose specific data ranges for dates of birth, exposure dates, and dose values.
- Monitor types: choose specific types of monitors (e.g. whole body OSL).
- Text fields: search for individuals by name or monitors reported with comments.
How to Export
1. Go to ‘Home’ > ‘Export Data’ (left menu).
2. From the ‘Options’ menu, choose your desired ‘Export File Type’:
- Exposure Data: includes personal information and exposure data for wearers.
- Wearer Data: lists wearers and their personal information but excludes exposure data.
- Audit Trail: records all actions taken in the portal for your associated centre(s). Only centre administrators have permission to export audit trail logs.
3. Select specific ‘Centres’ (or ‘All’).
4. Use optional filters to narrow down your data.
5. Click ‘Export Data’ to download a CSV file.
6. Click ‘Reset Filters’ to start over.
